Forza!
Text Block Manager

The Text Block Manager can be used to easily control and maintain the text blocks in your document and keep the look consistent between documents.


1

This is the text block tree, which contains all the pages and page text blocks in your document.

For a page, the physical page number is displayed first and the displayed page number(s) is enclosed within parenthesis.

Items marked with represent multiple-page text blocks (that appear on a range of pages). All other items represent single-page text blocks.
When a multiple-page text block is selected, all other instances that belong to the same definition are underlined.

- Drag a text block to a style to assign the style on the text block.
- Drag a text block to a position in the Styles section while holding down the <Ctrl> key to create a style based on the text block.
- Drag a single-page text block to the Clipboard section to store it there.
- Drag an entire page to the Clipboard section to create a clipboard folder containing all the single-page text blocks of that page.
- Drag a single-page text block to another page to move it.

- Double-click on a text block while a style is selected to assign the style on the text block.
- Double-click and hold down the <Ctrl> key on a text block while any item in the Styles section is selected to create a new style based on the text block.

Right-click on an item to display the context menu:
Cut Cuts the text block(s) to the Manager's local clipboard. <Ctrl>+<X> or <Ctrl>+<Delete> can also be used.
Copy Copies the text block(s) to the Manager's local clipboard. <Ctrl+<C> or <Ctrl>+<Insert> can also be used.
Paste Paste the text blocks to the current page from the Manager's local clipboard. <Ctrl>+<V> or <Shift>+<Insert> can also be used.
Delete Delete the selected text block. Selecte the page to remove all text blocks on the page. The <Delete> key can also be used.
Create style... Creates a style based on the selected text block.
Page number... Change the page number for a text block. Please note that it's the printed page number you change, not the offset.
Text inserts Displays the text inserts associated with the selected text block. Select a text insert from the submenu to edit it.
Display this page Displays the page in the Finale document window. This command switches to Page View if necessary.
Create Guide Creates a guide (horizontal or vertical) exactly at the handle position for the text block. This feature is only available in Finale 2003 and later.
Expand all Expand all pages of the tree view.
Collapse all Collapse the tree view.
Reload Reloads the text block tree with the current information. This feature should be used if you change the text blocks "outside" the Text Block Manager, but it can also be useful as an 'Undo' feature.
2

This is the Styles & Clipboard tree.

The branch below contains the text block styles. A text block style is a description of the parameters that need tobe changed to get a certain effect.

The branch below contains the permanent clipboard storage. Here you can store text blocks that you want to reuse. Collect text blocks into folders.

- Drag a style to a text block to assign the style to the text block. Drag a style to a page to assign the style to all text blocks on the page.
- Drag a style to a text block while holding down the <Ctrl> key to "force assign" the style to the text block. Force assign means that any font style settings will be assigned to the complete text. If force assing isn't used, the text will only start with the indicated font style settings (any font settings appearing later in the text will be kept).
- Drag items and folders within its tree branch to rearrange them.
- Drag clipboard items to a page to insert it on that page.
- Drag a folder from the Clipboard section to a page to insert all the folder's text block onto a page.

- Double-click on a style while a page text block is selected to assign the style to the text block.
- Double-click on a style while a page is selected to assign the style to all text blocks on that page.
- Double-click on a style with <Ctrl> pressed down to force assign the style to the block(s).

Rename an folder or item by clicking on a selected item. Please note that the descriptions you give the styles/clipboard items will not affect the actual contents.

Right-click on an item to display the context menu:

New folder Creates a new style or clipboard folder.
New style (In Styles section only.) Creates a new style.
Delete Deletes the item/folder.
Move Use this submenu to rearrange an item. The following keyboard shortcuts can also be used:
<Ctrl>+<Up> - Moves an item up
<Ctrl>+<Down> - Moves an item down
<Ctrl>+<Home> - Moves an item to the top
<Ctrl>+<End> - Moves an item to the bottom
Copy to local clipboard (In Clipboard section only.) Transfer the selected text blocks to the Manager's local clipboard. <Ctrl>+<C> or <Ctrl>+<Insert> can also be used.
Paste from local clipboard (In Clipboard section only.) Inserts the contents of the Manager's local clipboard to the Clipboard branch. <Ctrl>+<V> or <Shift>+<Insert> can also be used.
Safety question for folder delete Controls if a safety question should be shown when deleting non-empty folders.
Properties... (In Styles section only.) Edits the selected text style.
3 Press the Apply button to process all changes made in the text block tree. Please remember that no text blocks are created or deleted until you hit the Apply button.
4 Right-click on the background to display a context menu with general commands related to page text blocks:
Autotrack page When this option is used, the selected page in the tree view will automatically be displayed in the Finale document window as well.
Safety question for multi-page text delete With this option ON, a safety question will be shown before a text block marked with is deleted.
Safety question for multiple text blocks operations With this option ON, a safety question will be shown before actions that affect more than one text block are processed.
Safety question for this page With this option ON, there will be a safety check if you close the page without using the 'Apply' button on unsaved data.
Revert to last state This command will revert the settings back to the last state when the 'Apply' button was used (or when the window was opened).
Hints Controls if hint texts should be displayed at the mouse pointer for this dialog page.
Forza! Submenu with WWW links to help/support.
5 When the mouse pointer is shown, you can drag the splitter to make more room for the left or right side of the dialog.


To create/edit a text style


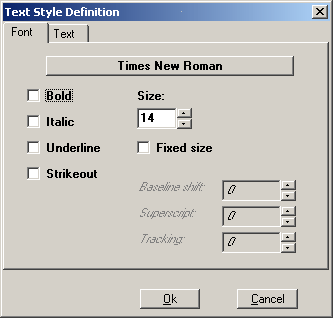
Creating or editing text styles is easy. These simple guidelines should be all you need to get started:
- Each style setting has its own "usage".
If a style setting is used, the style will change that attribute for the text block. If a setting is unused, that specific text block attribute will not be affected by the style.
- Style settings that will be used are displayed in boldface. Style settings that will not be used are displayed in italic.
- To change usage for a setting, right-click on the control to bring up the context menu.
- To change usage for all controls on the page, right-click on the background of the page to display the page context menu.
- Some controls also have a "No value" item in the context menu. This can be used to remove any existing setting.


[Back to Forza! home]